Consider using the TurboWarp Packager instead. It will automate most of the process for you.
Mac users: I am not super familiar with Macs so there may be some inaccuracies or better ways to do things, please let me know if this is the case!
Linux users: I am not very familiar with packaging applications for Linux. You will have to do a bit of your own research to finish things. Please report your findings so I can improve this guide for everyone.
Step 1 - Use the packager
- Go to the forkphorus HTML packager
- Enter your project ID or select the project file. Change the options to match your needs.
- Open the Environment Options section
- Set Packager Environment to NW.js (Windows/Linux) NW.js (Mac)
- Select a custom icon, if you have one. (must be .png)
- Make changes to NW.js package.json to match your project:
- Use the config generator if you are unfamiliar with JSON.
- Save this text somewhere because you'll probably want to reuse it if you ever update your project.
- For a full list of usable fields, see the NW.js documentation (Advanced users only)
- Click the Package Project button at the bottom of the page. This will generate a file named package.nw. app.nw. Hold on to this file, it will be needed shortly.
Step 2 - Use NW.js
-
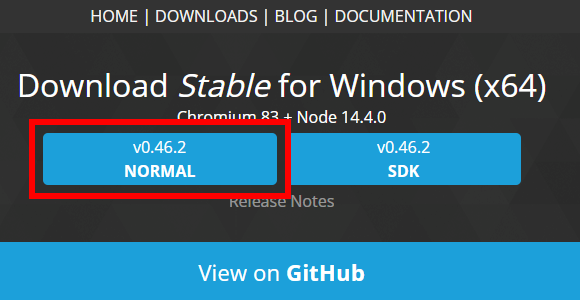
Download NW.js's "Normal" version (not "SDK") for your platform.
![]() NW.js should automatically detect your operating system and show the correct download. Otherwise, go to the Downloads page and find the correct download.
NW.js should automatically detect your operating system and show the correct download. Otherwise, go to the Downloads page and find the correct download.
The "SDK" version works, but it includes extra tools you won't need. -
Extract the archive.
Mac users: This may happen automatically.
Linux users: Here's the command for that:
tar -xzf nwjs*.tar.gz - Move package.nw (the file generated by the packager in the previous steps) to the same folder where nw.exenw is located. Make sure that this file is named exactly "package.nw" and not something else such as "package(1).nw". The file extension should be .nw, not .zip or .html. Right-click or Control+Click nwjs and select Show Package Contents. Move app.nw into the Resources folder. It may be easiest to open two windows to do this.
-
Your NW.js folder should now look like this:
![]()
![]()
![]() The highlighted file is what you should have created.
The highlighted file is what you should have created.
- Optionally rename nw.exe nwjs nw to something else, such as the name of your project. (make sure to keep the .exe ending)
-
Open
nw.exe
nwjs
nw
or whatever you renamed it.
Linux users: You may need to open a terminal and run
./nwto start NW.js. This should be fixable by using a.desktopfile. -
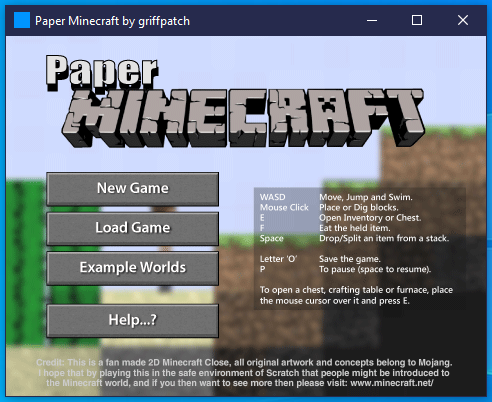
The project should launch!
![]() griffpatch's Paper Minecraft project running as an exe on Windows with a solid blue icon.
griffpatch's Paper Minecraft project running as an exe on Windows with a solid blue icon.
![]() griffpatch's Paper Minecraft project running as an application on Mac.
griffpatch's Paper Minecraft project running as an application on Mac.
![]() squig3's Scratch port of Ikachan running in Linux. (Manjaro GNOME with Adwaita Dark theme)
squig3's Scratch port of Ikachan running in Linux. (Manjaro GNOME with Adwaita Dark theme)
 NW.js should automatically detect your operating system and show the correct download. Otherwise, go to the Downloads page and find the correct download.


Slow startup with large projects
If your project is very large, it may take a while for NW.js to start with this packaging method.
If this is the case, you can change the file extension of package.nwapp.nw to .zip,
and extract the files within this zip to the same location where package.nwapp.nw was located.
The app should function the same, but start faster.
You can delete package.nwapp.nw after doing this.
Mac Packaging - Further steps
Create a zip archive of the app itself and credits.html (included in the NW.js download). You must include credits.html, otherwise you may be violating the license of some projects used by NW.js. (not legal advice)
See the NW.js documentation for the full list of further steps. Some of the more important and simpler ones are described below.
Changing the Icon
Use Image2icon to generate a .icns file. Replace Contents/Resources/app.icns in the app to change the icon.
Renaming the Application
See the NW.js documentation linked above.
Notarization
You should sign your app, otherwise users will get scary warnings when they try to run your app with Gatekeeper enabled. See the NW.js documentation for more information.
Linux Packaging - Further steps
Linux Users: I am not very familiar with packaging for linux. You are mostly on your own here. Please help write this section on GitHub!
You'll probably just want to archive everything into a tarball and have your users extract it. You may will want to make a .desktop file to get a proper desktop presence.
I think that AppImage would be a great way to package this type of app, but I'm not sure how to do that.
Windows Packaging - Further Steps
Changing the icon of nw.exe
You can use a tool like Resource Hacker to change the icon of nw.exe.
You will probably need to use a converter to convert your images to .ico files.
The icon you will want to change is Icon 1. Right click on it and select "Replace Icon" to change it.

Distribution
There are many possible ways to distribute your packaged project for Windows. The ones that will be described in more detail here are:
- Zip - a .zip archive that users must extract and manually run nw.exe (or whatever you renamed it). This is the simplest method and the most common.
- Make SFX (Self Extracting Archive) - a .exe file that automatically extracts itself and runs your project.
There are also ways to create installers for your projects using tools like . This is out of the scope of this guide.
Creating a zip archive
- Find the folder that contains nw.exe. This is not nw.exe itself, but rather the folder that contains it. It should be named something similar to nwjs-v0.46.1-win-x64 unless you have already renamed it.
- Rename this folder to something such as the name of your project.
- Right-click on the folder and select Sent To -> Compressed (zipped) Folder.
This will generate a zip archive that contains your project.
Users will have to extract this archive and open nw.exe (or whatever you renamed it) manually.
Creating a self-extracting archive
A note on anti-viruses
Some anti-virus software detects all self-extracting archives as viruses. For this reason, I would recommend using a simpler Zip archive instead of creating a self-extracting archive.
Self extracting archives also make your project take significantly longer to launch, and are not very common.
Using Make SFX
Make SFX is a tool for creating self-extracting archives. Other similar tools include 7-Zip, PeaZip, and WinRAR.
- Complete the first section using NW.js first.
- Download Make SFX from their website.
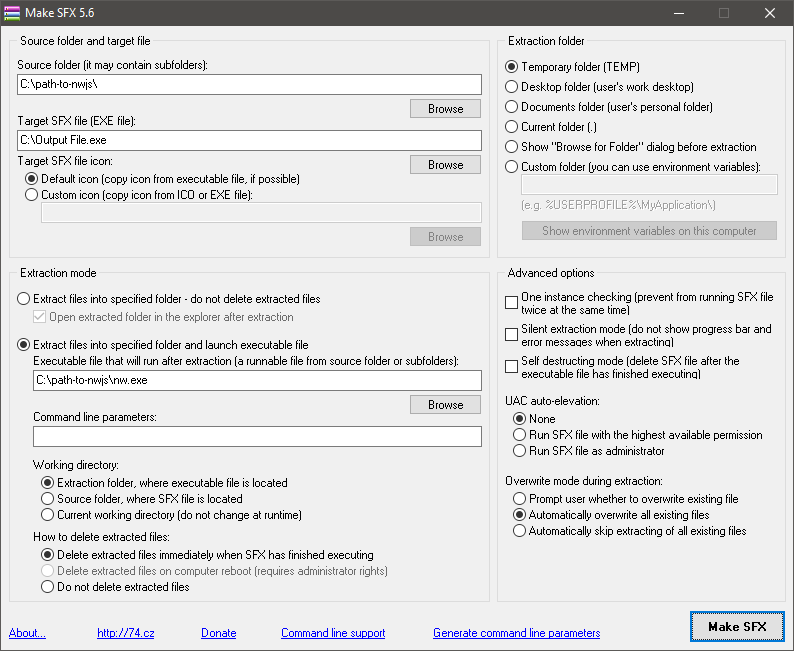
- The Make SFX interface is rather daunting. Pretty much, configure it so that it looks like this:
![]()
- "Source folder" is where you extracted NW.js to (again, the folder that contains "nw.exe" or what you renamed it)
- "Target SFX file" is where the .exe created by Make SFX will be saved
- You may want to change the icon of the file. This does not affect the icon of the Window.
- Set "Extraction mode" to "Extract files into specified folder and launch executable", and set the executable file to the path to "nw.exe" (or whatever you renamed it)
- Set "Overwrite mode during extraction" to "Automatically overwrite all existing files"
- Run the output file and make sure it works.
- You're done!
Android Packaging
To do this we will embed a link to the packager. This isn't ideal but it works good enough and actually embedding a file isn't officially supported right now.
We will discuss two methods to do this.
Note that the Google Play Store has a one time fee of $25.
Generate forkphorus packager link
Note: This does NOT use the HTML Packager.
- Go to the forkphorus homepage
- Load your project
- Scroll down to Package this project, configure settings, and click Package to generate a forkphorus packager link. This link should start with: https://forkphorus.github.io/app.html?...
- Keep this link around, it will be needed later.
First Method - Using AppInventor to embed
Perhaps using AppInventor just to embed a webpage is a bit overkill, but it works good enough. These steps do not require any programming knowledge — just follow what them exactly.
- Go to the AppInventor home page and hit Create Apps!. Sign in with a Google account.
- Hit Start new project, name the project (this doesn't matter), and hit OK
- From the Palette on the left, drag a WebViewer into the Viewer in the middle of the screen.
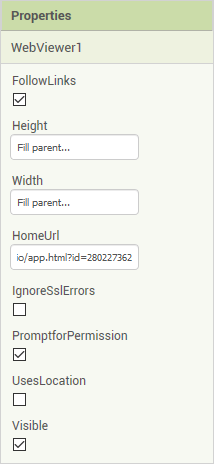
- In the components menu, select WebViewer1 and configure it like so:
Width Fill parent... Height Fill parent... HomeURL The URL generated by Forkphorus from the previous scetion. ![]()
- In the components menu, select Screen1 and consider the following optional settings:
AppName The name of your app (eg. Paper Minecraft) TitleVisible false (unchecked) to remove an ugly titlebar from your app ShowStatusBar false (unchecked) to hide the native Android status bar while your app is running ScreenOrientation Landscape or Portrait if you want to force a specific screen orientation, otherwise leave this to its default value. Icon A nice icon for your project. ![]() These are all optional. There are some other options you can set but many of them will have no effect.
These are all optional. There are some other options you can set but many of them will have no effect.
- To create an APK:
- Select Build > App (provide QR code for .APK) and scan the QR code on your phone
- or Select Build > App (save .apk to my computer)
- For help on publishing to the Google Play Store, see Publishing Apps to Google Play (App Inventor 2)
 These are all optional. There are some other options you can set but many of them will have no effect.
Second Method - Using AppsGeyser to embed
- Open the AppsGeyser page Create Smart URL App
- Insert the link Forkphorus generated into the Website URL box.
- Choose a color theme, and hit NEXT
- Fill out details such as your App's Name, Description, and Icon, and then hit Create
- From here, navigate the treacherous interface to Publish or Download your APK.